Friday, 9 December 2011

5 Petal Ribbon Flower

How to make a 5 Petal Ribbon Flower

Cut Five Lengths of 7/8" Ribbon, all the at 2 1/2 inches long. Heat seal the ends.

Tip: Cut the lengths with a woodburner, which cuts and seals the ends in one step.
Fold the ribbon in half and mark the center edges with a pencil.

There are two ways to make the petal point on flowers, sewing the center points or heat sealing the center points.
Heat Seal Center Points
Bring Center marks together, hold with a pin. Touch the centers with the pointed tip of a wood burner. The wood burner will melt the ribbons together very quickly. Set the wood burner down and hold together for just a second to make sure they seal together.


Place a little bit of hot glue inside the pocket on the back side of the petal. Hold the new melted center to the middle of the petal back. This will hold your angle perfect and enforce the melted center.

Repeat the process on all petals.
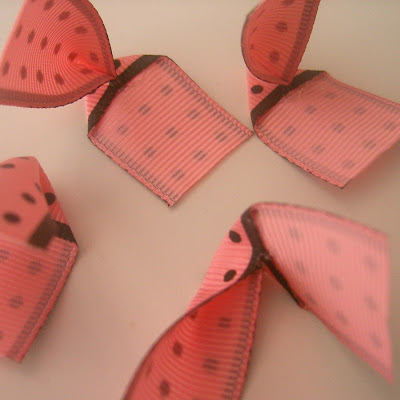

Sewing Center Points Place needle through the center edge marks.

Pull tight and tie a couple of square knots.

Attach the center to the back with hot glue or sew it. This keeps the corner or peak the same degree/angle.

Bring the edges together on a petal (make sure the glued edge is on the back so the front will puff up a bit).
Thread a needle with upholstery thread and tie the ends together with a knot.
Sew with a needle using similar stitches on all of the petals.

Continue to sew the remaining petals on the same thread.

Pull the petals to the end, so they stop at the knot.
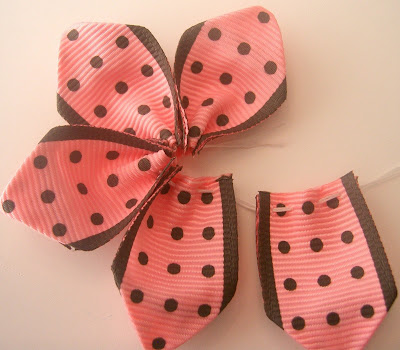

Thread the needle through the start petals first couple of stiches.

Pull the thread really tight, making sure all the edges stay flat or touching.

Tie the end off on the back side of flower.
Optional: Leave the beginning tail long and tie thread lengths together in a knot when the flower is complete.


Sew a center to the flower. This flower has a piece of scrapbook punched felt under a pink button, sewn with the same upholstery thread as used to make the flower.

Examples of the different lengths of ribbon.

Silk Ribbon Embroidery Tutorial

Materials Needed for Silk Ribbon Embroidery Star Rose Stitch

  • 10 mm Silk Ribbon
  • Ribbon Needle
  • Fabric
  • Embroidery Hoop

Step by Step Silk Ribbon Embroidery Star Rose Stitch

Kurdele Nakışı Yıldız Gül Tekniği | 1. Adım First thread your ribbon through your needle so your ribbon may not fray. Pull your needle from under fabric and take it upside. I see foreign bloggers use inches for measurements but I’m not much familiar with inches :) So have to tell that, for the size you see on fabric of other completed star roses, hold your ribbon at one handspan distance. If you want to make wider rose, then hold your ribbon at longer distance from fabric.
Kurdele Nakışı Yıldız Gül Tekniği | 2. Adım Hold you needle on ribbon as seen in picture
Kurdele Nakışı Yıldız Gül Tekniği | 3. Adım Just as in needle lace( I assume you know:) ), make a knot on ribbon.
Kurdele Nakışı Yıldız Gül Tekniği | 4. Adım Now make straight stitches on ribbon downward with 1/2 cm or 1 cm distances.
Kurdele Nakışı Yıldız Gül Tekniği | 5. Adım Keep making straight stitches as seen in picture.
Kurdele Nakışı Yıldız Gül Tekniği | 6. Adım When you have completed your threading, pierce your needle from the point you started.
Kurdele Nakışı Yıldız Gül Tekniği | 7. Adım Pull your needle gently downward until your un-stitched ribbon taken under fabric.
Kurdele Nakışı Yıldız Gül Tekniği | 8. Adım Our lovely star rose shined and blossomed finally:)
Kurdele Nakışı Yıldız Gül Tekniği | 9. Adım

The Bird Of Paradise Napkin Fold

Bird Of Paradise napkin folding directions


This is a classic and classy napkin folding technique that requires a stiff napkin. If you don't have any dinner napkins made of stiff linen then a light starching should fix you right up.

Napkin Fold #1
1. Lay the napkin face down in front of you.
Napkin Fold #2
2. Fold the napkin in half.
Napkin Fold #3
3. Fold the napkin in quarters.
Napkin Fold #4
4. Fold the napkin in half diagonally, creating a triangle.
Napkin Fold #5
5. Orient the triangle so the open tip is facing away from you.
Napkin Fold #6
6. Fold the right corner diagonally towards you - laying it down along the centerline of the triangle, making a new tip pointing towards you. An iron can make this important fold a whole lot easier.
Napkin Fold #7
7. Do the same with the left corner, fold it diagonally toward you and press it down next to the previous fold. Now you have a diamond, you're rich! Yay!.
Napkin Fold #8
8. Fold the two "wings" that you just made in folds 6 and 7 under so that you have your original triangle shape back. Once again an iron can make a world of difference.
Napkin Fold #9
9. Fold the triangle in half by bringing the center seam towards you and allowing the ends to fall.
Napkin Fold #10
10. This bird's almost ready to fly, but first you must give it some feathers. While holding the base firmly to keep your folds together, pull up the four 'flaps' created by the napkin's corners.
Folded Napkin
Pretty cool fold, isn't it? It makes you wonder if there are people sitting around in basements performing experimental napkin folds while the rest of us are sleeping. This fold can be difficult if you don't use an iron or have a fairly stiff napkin so be prepared to put a few minutes into making each one.

Napkin folds

The Fancy Silverware Pouch Napkin Fold

The Fancy Silverware Pouch

This is similar to the basic silverware pouch, except for two more folds near the end. It is good for a more decorative touch than the basic pouch.

Napkin Fold #1
1. Lay the napkin face-down in front of you.
Napkin Fold #2
2. Fold the napkin in half and orient the open end toward you.
Napkin Fold #3
3. Fold the napkin into quarters.
Napkin Fold #4
4. Orient the napkin so the open corner is facing away and to the right.
Napkin Fold #5
5. Roll the top-most layer of napkin diagonally down to the center and press it flat.
Napkin Fold #6
6. Roll the next layer down until it meets the first and press that one as well.
Napkin Fold #7
7. Repeat the last step once more.
Napkin Fold #8
8. Turn the napkin over.
Napkin Fold #9
9. Fold the right side back about 1/3 of the way and press it down.
Napkin Fold #10
10. Fold the left side back also about 1/2 of the way and press.
Finished Silverware Pouch
11. Flip it over and insert the food poker, slicer, and scooper. So what's for dinner?